Maintenance and storage of goods
The sheets are unloaded from the transport onto a base in the construction site, which is a dais at least 20cm-high from the ground and is made of cross girders placed at least at a meter?s distance from behind. It is advisable to transport sheets with derrick crane car. The sheets are generally packaged in the factory and are therefore easily liftable with the crane and frame. If no crane at your disposal, the sheets should be lifted one by one. At this point, one should avoid the friction of sheets – they should be lifted, not pulled! The sharp cut edges of sheets can damage the finished coating of an underneath sheet.
Thin steel sheets may bend slightly, which is why they are to be handled with caution. Besides, the sheets are easily stretched. Sheets cannot be lifted being held by the two ends only! The sheets can be lifted to the roof using stable support beams and lifting these at many places. Possible scratches and other surface coating defects are removed with special aerosol paints.
Zinc-coated sheets should not be stored in the outside conditions while they are being tightly packed. The sheets should be protected against direct precipitation. The accumulation of water and humidity between the sheets should be avoided.
The coloured and plastic-coated sheets can be stored unpacked within up to fortnight. For longer periods of storage follow the rules for zinc-coated sheets.
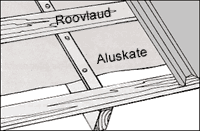
Underlay
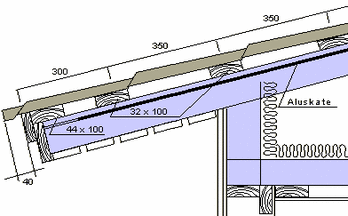
Sheets and tile profiles require underlay to be used, which would prevent the absorption of condensation water in the underlying structure of the roof and protect it against precipitation during construction. The underlay is fastened to the rafter with a distance piece. It is important that the underlay is not tightly stretched, but lies free. The underlay is ceased at the ridge.
Lathing and end boards
The first batten should be thicker by the depth of groove of gauge (10 – 12 mm). The upper board of the end board of the roof should be 40 mm higher than the lathing battens.
Installation
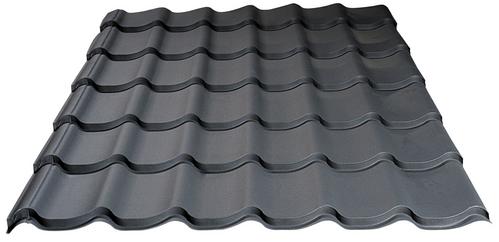
The necessary roof pitch angle for the installment of the tiled profile is not less than ŧ. The installation of sheets is always started from the right side of the building, in hipped roofs from the contact point of hip and gable. The water discharge pipe at the edge of the sheet should be covered with the adjacent sheet. The sheets should be installed cross-wise to the eaves at an elevation of 40 mm. The first three or four sheets should be installed with one or two screws, evened with the eaves and thereupon definitively fastened to the batten. When working with the sheets never use abrasive cutting tools!
Joints
The roofing sheets are jointed lengthways at transverse grooves with an overlapping of ca 200 mm. The side joints are made with a profile-wide overlap. In the slopes (less than 10° pitch angle) it is advisable to use sealing mastics or longitudinal groove filler.
Fastening
The sheets are fastened to the batten with self-drilling screws 4,8x25mm, that are driven into the bottom part of the wave of the corrugated sheet below the transversal groove. The suitable tool is electric or accumulator drill with clutch. The amount of screws used is ca 7 pc per square meter. When making a longitudinal joint, the screws are driven into the bottom of each wave, at eaves and ridge into the bottom of every second wave. The side overlappings and flashings are fastened with screws.
Cleaning and maintenance
The steel crumb remaining after processing the sheets has to be carefully cleaned with a brush. The crumb if it remains on the surface will rust and may cause damage to the sheet surface. The sheets that got wet can be cleaned with domestic detergents (do not use solutions and other strong chemicals). The roof should be cleaned from leaves and sweepings every spring and autumn. When cleaning the roof from snow, be careful not to damage the coating. In case of coating damage, use correction colours.
INS